Eura Underdress – The Family Look pt. 2

The continuation of the Eura underdress journey. (See here for previous entry.)

fin-undertunic-pattern-mineAfter much deliberation and pulling the dress off and on again I decided to take it all apart. I was right when I had assumed that the dress would wind up far to large for myself.  As a reminder I used  the pattern to the left as my starting point. After getting it three quarters done I was better able to see how it would fit and I wasn’t  liking the fit at all. The length was too long, the girth too big, and the neck line too deep. In short it was a mess.

The first thing I fixed was the neckline since that would affect the hem length and where the gores sat. You can see the dotted line in the image below from my whiteboard that the sleeve/torso base was 25 inches.  I ended up taking off 4 inches (2 off each side) so that the neckline wasn’t a plunging affair. I also took 4 inches off the top of the torso pieces because with the gores it was still too big. I’m fond of fuller skirts though so I just fudged the angle until they met again.

Next came the gores. You can see a lot of green lines on the left side of the drawing below. One of the things I noticed is that the last 10 inches or so of the gores were completely useless to sew because it just gets too narrow. My sleeve at the wrist was plenty wide as it was so I decided to end the gore just beyond my elbow. You can see that from the top to the last green horizontal mark is 70 inches. Naturally I  pinned and checked this before going further and found that the gore still made the body far to large especially when I considered adding the gore on the other side. My solution was to make sure I had enough room over the bust and just shave the gore down that way. The 16 inches running vertically is the distance from just after my elbow to my bust. The 3.5 inch measurement is what I needed for comfort in the bust after taking out 4 inches from the top of the torso pieces.

Rough draw of my own measurements (in black) and the adjustments (in green)

So after all the adjustments were done (at least the cutting bit) I sewed it all together and tried it on. It fits just about perfect. The hemming will be a bit of a pain since the sides hang longer than front and back due to the gores and how the thing is pieced together but I approximated it the best I could alone. I wore it this past weekend at Panteria and it was pretty much perfect. The gores that ended just after my elbow gave me enough room to bend my arms and over all I had a full range of motion. (Note: I’m not proportionate and have a very wide back and shoulders so this is often a problem for me.)

The next thing on my list to do is to make up a dress for my daughter in this pattern. A lot of parents swear by it since there is no underarm gore which tends to be a high stress point for growing youths. I’ll update this later with a finished picture.

Categories: Garb, Norse Garb | Tags: , , , | 4 Comments

Eura Underdress – The Family Look pt. 1

So for a long time I’ve been hearing about the Eura dress. In the SCA it’s worn often times with a Viking apron dress besides the as a medieval Finnish outfit. The other great perk about this particular pattern is that there are no underarm gussets for kids to rip through. I’ll talk about that more in a minute. I have to get some history in first.

As a personal preference I dislike wearing things unless I have a basic understanding of the period in history from which it came. So when I set out to make this pattern I also started to gather up information. Eura is a parish in south-western Finland. The archeological find there is the largest in Finland and the estimate over a thousand graves were found and apparently they haven’t finished going over them still. I have a description of the richest of their finds below and the one that was most easily reconstructed:

eurapattern

Page 50 from Ancient Finnish Costumes


“The richest grave found up to now in this famous burial place was discovered already in the summer of 1969. It belonged to a rather tall woman, who had died in the early part of the 11th century at the age of about 45 years. In addition to round buckles with knobs worn on the shoulders and another brooch to fasten the cloak, bronze chains, broad spiral bracelets and four rings, the deceased wore a necklace comprising coloured glass beads, twelve silver coins and two silver pendants. At the level of her waist there was an adorned bronze-plated knife sheath. Furthermore, her cloak and apron were ornamented with bronze spirals.”¹


Eura dress Layout

The way I laid out my dress pattern, running the length of the fabric.

So this particular costume is what most people I’ve talked to termed Late Viking. So it makes sense that there are a lot of similarities. Unfortunately most of the patterns for the under dress don’t include measurements though I was able to find one with measurement suggestions. You can see the pattern I followed below which I found here.² I kind of had to guess a bit but not nearly as I much as I though I was going to have to. The image above and to the left is from the same book I referenced above. There is one thing to note: if you are over a size 16 mundanely the layout to the left may not work for you. I wear a size 18 and this layout would never have worked for me. My gores would have been itty bitty. I like my under dresses to be not quite as fitted and with a bit more room in the skirt so had to modify the layout. It took me 2 and 1/2 yards of 52″ wide material to make the finished dress you see here. I have included my rather inelegant MS Paint line drawing of my own layout to the right.


fin-undertunic-pattern-mine


The measurements are kind of vague on this form. For instance I have no idea what the author meant by the “shoulder” measurement and it’s not explained either. Also the author recommends that fabric of any width would work. I don’t agree and as I continue the construction of this dress I have to say that there is a maximum width to the fabric that can be used when laying it out the way I did since the folding method won’t work for a bigger girl like me.

I’m currently in the process of making the dress now and taking pictures as I go. I’ll post again soon with progress and show you what I mean.


1. Pirkko-Liisa, Lehtosalo. Ancient Finnish Costumes. Pg. 45. Helsinki, Finland: Suomen Arkeologinen Seura/The Finnish Archaeological Society, 1984. Viking Answer Lady. Web. 11 Apr. 2015.

2. Of Rowanwood, Jocelyn. “Court of Catherine & Jade.” Adventures in the SCA. N.p., 14 Oct. 2008. Web. 14 Apr. 2015.

Categories: Garb, Norse Garb | Tags: , , , | 1 Comment

Kids Classes in the SCA & A Game Pouch

My son and I at Pennsic 2010

My son and I at Pennsic 2010

Children. For most SCA groups there is an ongoing conversation on how to involve the children more and more into the Society. For a long time we have had youth combat which starts at age six. While that is all well and good the rest of the children (ans there are quite a few in this area under the age of six) are left to their parents and their own devices. For the most part parents make it work. I have brought my oldest son to a few events and you can keep them happy. Just don’t expect that you, as a parent, will get to classes or activities that you want to go to. Again, not that big of an issue as long as you’re prepared for it. Yet the martial activities are only part of what we do in the SCA.

To that end, there have been two new developments here in the East Kingdom. The first is a Society-wide venture mentioned here, in the East Kingdom Gazette, about a scout-like program that they are trying to get off the ground. I’m very excited about this venture, I must say. The second is a movement started by our most gracious Queen, Caoilfhionn Augusta. Called the Kids Service Initative, it uses a point system to reward children helping at events. With different chore difficulties and required effort being assigned different point values, each child participating attempts to gain at least ten points. Upon reaching ten points they hand in their form one half hour prior to court and get a token from the hand of the Queen. While this particular activity is mainly run at Royal Progress events however I was deputy autocrat and between the autocrat and I we decided that we would run this. It was a success in that we had three young ladies win ten points and get a token of a tassel from their Excellencies Bergental. 

After seeing how well this worked I thought about other things that worked that I wanted to have at my event that I’m proposing to have next June. I hit a mental block when it came to youth classes. While classes work for older children it doesn’t make the most sense for the younger ones. As a parent I know that my schedule depends highly on that of my children. When they nap, eat, and want to play affect what I can do when I go to events. Among all this I try to consider the classes for the youth. Most likely my four year old is too young for most of the offerings and the classes only run once during an event. If he misses it due to napping then that’s that. The more I thought about the practice the more it seemed broken somehow. Children nap through it or the few classes clash with other things that mom and dad may want to do. Classes are one thing for the older kids but for the younger set something needs to be done. 

So I got an idea. It’s not really a new idea as I’m kind of taking it from work. I work at Old Sturbridge Village. One of the things that we have there is a Craft Center. The concept is simple: a couple of tables with manned tables in a small outbuilding that offer a craft or two throughout the day. It closes at times for lunch but other than that we work to cover on lunch breaks. It works for a larger place so why not for events? My idea is very similar. Place a table or two in a well trafficked area and ask gentles to volunteer their time to staff the table, much like gate, for an hour or two. It would be on a drop by basis. Children could come with their parents at a time that suits them. The projects would be geared towards the younger crowd and, if it really works, have projects of varying difficulty to be offered. I’ve worked in the craft center and it’s a very neat thing. Children work at different paces and this format allows them to do that. 

So one of my thoughts on this was to make a simple pouch. The best way to test out if something works is to make it yourself. So I did. I made a simple pouch with the idea that I could embroider the game board on the inside but I needed it to open flat. I went with a simple pouch. A plain colored lining with decorative outer. What became evident very quickly was that this was not going to be for the young ones. While the pouch I made (easily with the help of a sewing machine) is useful and pretty, it’s not something that could be finished at the table, which is a priority. At 75% of the work of the project should be able to be completed in 20 min or less. That’s the goal.

Being the stubborn person that I am, I wasn’t  going to give up so easily. So I have a theory in mind that uses felt and hole punches. I’m hoping it will work but I need to try it first. The theory I think is sound and I’m looking forward to trying this out. Like classes children would be charged for their kits but I would try to keep it down to only a dollar or two. 

More news to come as I try to make this happen. 

Categories: Youth | Tags: , , , , | Leave a comment

A Proper Super Tunic

***PLEASE BE PATIENT THIS POST IS IMAGE-HEAVY***
 

I am very excited to be going to Pennsic this year. Sadly, after having my second baby my body doesn’t resemble what it used to. Needless to say that I now need make more garb and alter the few things that I can, in order to have a workable wardrobe for Pennsic.

Woman’s outfit, from an 11th century illustrated
manuscript in the British Museum.

One of the pieces that I used to have (it seems to have walked off somewhere) was a super tunic or an over tunic called a Gunna, in the fashion of the Saxon women, like the one to the right. It was not one of my best pieces of work. I had made it in the “quick and dirty” fashion. That is, I took my existing tunic dress (folded in half lengthwise) and placed it on another piece of fabric folded in quarters. I traced the shape I wanted according to the existing dress. Like the picture below. It was something done on the spur of the moment and the finishing was awful. The fit wasn’t perfect but I t was comfortable and easy to wear. With all that in mind I decided to make another.

“Quick and dirty” method.

I don’t usually like using what I call “icky” fabric like rayon, nylon, and polyester. I do however make exceptions. This is one of those times. While there are a lot of cons to using this kind of fabric like no breathability, odd textures, and it’s tendency to melt when touched with fire, there are a few good things to keep in mind. Many of these fabrics are hard to wrinkle and generally wrinkle less when packed. Need to look great on the first day at an event and don’t have time to let something hang out to get the wrinkles out of that linen? This is perfect for that. Also, I find that these fabrics are harder to stain. The big clincher: the price. Linen/Rayon blends are cheaper than straight linen and even linen/cotton blends in many cases.
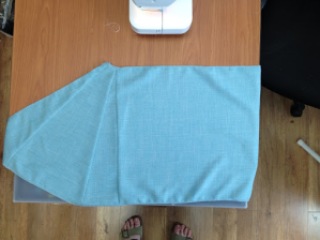
Pieced sleeve. 4 pieces to achieve the desired bell shape. 

In any case I found myself with a bright teal piece of fabric that seemed to suit my purpose. Like I usually do, I washed the fabric and dried it on the hottest setting. (This is what’s meant by pre-shrinking folks. Do it before so you don’t wind up with a child size later.) After all of that I ironed it and measured the final dimensions. Then came the planning. I know what I want it to look like: a full skirt reaching to my knees and a fairly decent bell sleeve that falls to my elbow. The fabric is sufficiently small that I had to get a bit creative in my layout and piecing of the sleeves. I’ve put a picture of one of my completed sleeves to the left. I had debated on whether or not I was going to surge my fabric but after seeing how easily it was coming apart it was a no-brainer.It was coming apart easier than some linens I know. I put a before and after image below.

Top seam: serged. Bottom: not serged.
Non-serged seams. 
Main material with sleeve lining.

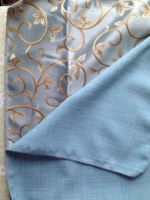
I also decided at this point that I had to make my over tunic a bit fancier. First of all I needed additional fabric for the gores of the skirt and secondly because I didn’t want the seams to show inside my sleeve. A lining of something fancy was in order. A while back I picked up several pieces of fabric from the remnants bin at Osgood’s. So many good finds! In any case I have a light blue satin with vines that will do the trick nicely. I’ve added the picture above.I thought about doing the neck facing in the same material but in the end I didn’t have enough.That’s okay though. This was planned to be a use of odd bits, ends, and remnants.It’s part of the reason that the sleeves turned out the way they did. So I put both the sleeves together and then just took them and traced them on to the lining fabric to make sure they matched up. The satin I didn’t bother to piece and just did it in one whole piece. I had enough fabric to do it and then my OCD wouldn’t kick in to try and match the pattern on each piece. I was working out of habit when I sewed my lining and sleeve together.I realized that the traditional methods of sewing weren’t going to apply. Traditional methods of sewing the lining and main piece together are to sew the three sides together and then turn it inside out or sewing the separate pieces into tube than putting them together didn’t really work. It didn’t help that I had had to put them together over two days. I ended up going to bed saying, “Don’t make that same mistake again tomorrow morning.” It inevitably meant that I did make the same stupid mistake. Lesson learned! The end result was very nice and I was super excited to get the rest of it put together!

Both sleeves complete with lining.

Just taking a moment to show you the sleeves since I mentioned how they turned out earlier. Usually the sleeves would be rounded on the bottom, not squared off. The lining looks great and I’m really happy with how they look.

The sleeves done, it’s time to tackle the main body part of the tunic. This is fairly straight forward. I’m not putting any gores in the front or back of this piece. Again, remember that I’m working with small fabric pieces to begin with. As it is I have to use the vine satin to put the side gores in. All I have of the solid teal-blue color is a strip about two inches wide.

After I’ve cut the gores out I’m faced with what to do about the neck facing. With not enough fabric of either to do the facing the way I usually do, I go diving into my remnant bin. I cam out with this dark goldenrod cotton which worked perfectly. Now I just had to decide on what kind of neck to do. I usually do the fastest thing for myself and, since this was fancier than most of the stuff I’ve made for myself, I decided to go with a keyhole type neck. The biggest thing for necklines is to place them properly. It’s easiest to just find the center and layout your neckline over that. I took the time to do it properly: 2/3 of the opening in front and only 1/3 behind. The keyhole is a pain when I’m working towards a deadline but thanks to a hot iron and plenty of pins I was able to get it done in fairly short order. I put the picture below.

Neck facing 1/3 done while on the ironing board. 
Left side done! 

This also takes a lot of pins. And patience. It was well worth it though and after the neckline was done I was able to put my first sleeve on with the gore and I was happy with how it looked. Though in retrospect I think I would attach the sleeves with the drape in back rather than against my ribs…It’s not a huge deal and something I can fix easily down the line. You can see what I’m talking about in the picture above. As it stands now, when I’m moving, you can’t really tell anyways. (See the picture, below.) Oh, and disregard the orange dress peeking out from under the blue dress in the pictures at right!

Left side, arm raised.

Putting on the last sleeve and gore was a snap. I was able to finish it and hem it all in about four hours. (Interrupted time…baby, husband, etc.) I’ve put the pictures of the completed right side and the completed, hemmed garment below. Yay! My first new piece of garb in four years…*lol*

Completed, hemmed supertunic.
Completed  right side.
Categories: Anglo-Saxon Garb, Garb | Tags: , , , | Leave a comment

Post Baby Garb

So I know it’s been a while since my last post but I think you can expect many more soon. After having my second baby, a healthy girl, none of my garb fits. Not only that but I need to remake or fix a lot of the stuff I have. It’s a bit aggravating but after child birth your body changes and, well, my garb is now looking like it was made for someone else. In a sense it was I guess.

I started on updating my wardrobe last night by making the first piece of my Persian outfit. I did my research and while striped fabric wasn’t often used in period other than for the lower classes it was what I had on hand. 100% Cotton teal stripe, a fabric I picked up a few years ago as an impulse buy. I figured that I would find a use for it eventually and I was right! I figured that the finished pants would be light weight and comfy enough for both summer and winter events. I followed Rashid’s pattern for 16th century Salwar pants for my first attempt which I’ve put below:

I followed the instructions with no changes (always a good idea for the first time around) with one exception: I didn’t guess on the measurement for the ankle opening. Instead, I measured around the heel and top of my foot, at the ankle, while my foot was pointed. As if I was putting on pants. Since this pattern works on a fold I simply halved that measurement and drew my diagonal line to there. I also upped the thirteen inch  rise measurement to fifteen since I am taller than the average woman. In the end I don’t think that it was necessary but better to be safe than sorry the first time around! While I did measure in the recommended way, I feel like the pants are a little long. I may shorten the rise on the next pair or modify these if they I find that they’re too long. I need to get some input from someone who makes them on a regular basis.

Today I’ll start working on a kamiz using Rashid’s pattern for a 14th century Kamiz/Pirihan. I’m using slightly thicker material than would be ideal but we’ll see how it goes! I’ll post pictures of the pants soon!

Categories: Garb, Middle Eastern Garb | Tags: , | Leave a comment

Blue Linen Dress Re-Do: Trim Found!

So today I took my DS to have lunch with daddy during daddy’s lunch hour. There’s a great fabric store right around the corner from my DH’s workplace so naturally I had to stop. This place is extensive and stocks everything from apparel fabric to whole hides of leather. I had two things on my “to buy”  list. The first I was disappointed in: faux fur for my son’s bear Halloween outfit. The second and successful find was trim for the blue dress re-do. I found a short remnant in the colors I have as well as two larger pieces and I’ve pretty much decided to go with the lighter themed of the two. I’ve posted the picture below.

I don’t like to buy much commercial trim (but do due to time constraints) because of the mostly glaringly obvious non-period materials and patterns. There’s a great picture from a class that was presented and I use it as a good visual aid. I’m trying to find it now. Basically staying away from all of the super shiny metallic silver and gold stuff and sticking with trims that you usually find in the upholstery section is a good bet. That’s actually where I found all three of my finds today. The trim pictured above is fairly simple being two twists of blue and gold laid side by side and stitched to the beige backing with light blue scalloped edges. It’s just enough color and simple enough to go with the dress. Everything else I had was too modern or not in the right colors to be used. I’m hoping that with the 8 yards that I purchased I’ll have enough. I was silly and forgot to measure the hem so I had to guess-timate. The thing is, I don’t get out to that store often and the reel had the original sticker ripped off. So I couldn’t tell you where to get this if I wanted to. I’ll be keeping a swatch of course for future reference but I’m not sure what I’ll do if I don’t have enough to complete the dress…I’ll cross that bridge when I get to it.

I was planning on doing more work on the dress this evening but my DS decided not to nap today which meant that keeping him on track for bed time took two parents, not just the one. We also tried to move a bit of our stuff from the garage into our new shed in preparation for the winter delivery of wood pellets that keeps our home toasty warm  during the winter. Perhaps I’ll get some work done tomorrow! I have ironed out the muslin to cut the mock ups out of and I am really looking forward to pining them onto the dress to see if my patterning skills have rusted at all! That’s all for now, hopefully I’ll have more news after the weekend!

Categories: 13th Century Garb, Garb | Tags: , , , | Leave a comment

Blue Linen Dress Re-Do Update

So after some mild hiccups in delivery I have a new bias tape maker arriving today! YAY! I’ll be able to move on after making all this bias tape. I’m hoping today to try out by drafted pattern for the side piece as well for the blue dress re-do.

This is the pattern piece to the left that I’ve drafted onto some plain brown wrapping paper. (My preference for my own drafted patterns because of it’s sturdiness.) I did not do this freehand, I’m not that talented. I did use my french curve tool a.k.a. Dritz’s Styling Design Ruler. (It’s something that all costumers should have!) I’ll talk about that tool at another time though. The next step is to cut it out of some muslin and try it on the dress to see if I need to make any adjustments before cutting it out of the dark blue linen. I’m hoping I can get at least this much done today before I have to go pick up my little man at daycare at 3:30.

The hem will have to be addressed next and maybe I can get that done tomorrow or Friday night. I’m hoping to have the major components of the dress put together (or fixed) no later than next week. By that I mean the added side pieces, hem piece, and shoulders. I’m thinking that there may need to be a facing put on the neck as well but I’ll see when I take the shoulders apart.

The bad news is that the lovely gold fabric in the swatch that I had planned to use for bias tape to cover the joining of the dark blue and light blue material refuses to be turned into bias tape. Even after several tries with the bias tape machine and doing it manually. GRR. Now I will have to revert to more commercial sources. I happen to have a fair stash of commercial trims of varying historical “period-ness.” Meaning, some are more period looking than others. I’m sure that I will spend a significant amount of time trying to decide what route to take but so far I’m leaning towards a plain bias tape trim or something equally plain in my designed trim. I will NOT be doing a blue trim though. I’m looking for something with higher contrast. Yellow, gold, or possibly orange are colors that I think would be ideal.

Categories: 13th Century Garb, Garb | Tags: , , , , | Leave a comment

Blue Linen Dress Re-Do Swatches

So as promised I finally took a picture of the materials that will be going along with the light blue dress re-do. I haven’t been able to do much work on recently but I’m hoping that will change next week. This week I’ve been in a super cleaning mode. “Nesting” is what my husband calls it. I’m just short of rearranging the whole house.

dress re-do

So here’s the picture of the materials. The lighting I think may have cause the colors to be slightly off in the picture but you can get the idea. The light blue is a piece of what I’ve already removed from the sides. The gold is a strip of to be formed bias tape that will cover the seam between the light blue and dark blue pieces. The dark blue will be the added border and lacing tabs to make it a laced surcoat. Come to think of it, I should post a picture of the pattern piece that I’ve drafted out to complete the sides as well. There’s not much to see really and the dark blue looks almost black but there it is.

Categories: 13th Century Garb, Garb | Tags: , , , , | Leave a comment

Blue Linen Dress Re-Do

So I’ve begun taking apart the light blue linen t-tunic type dress that was given me and prepping it for a re-do. I didn’t take picture of it while assembled but it was the basic pattern that many people use when they start out, located here.

The front of the dress.

I have so far removed the sleeves and widened the arm opening so now it somewhat resembles the final product: a sideless surcoat. The picture to the left is the front of this troublesome garment. Right off the bat you can see that the shoulders are odd and the hem is funk to say the least.

Below and to the right you can see the back of dress and the right shoulder seam pointing off into space. This problem is because the shoulder seams were an attempt at a flat felled seam. The previous owner didn’t have a serger and so tried to make the garment last longer by using this seam method. It didn’t work out so well… Part of the reason is that it wasn’t a true flat fell seam, just an attempt at one. There’s a lot of extra material in that shoulder seam that shouldn’t be there. It’s one of the things I’m going to have to re-do before the dress is wearable.

The back of the dress with shoulder points.

The other thing that is going to have to go is the hem. From these two images if the odd hem isn’t evident I have a better picture below. The hem is longer on the sides than front and back and the only way I see to fix it is to chop it evenly and add a border. Over all I think it will all work out rather well and I may even be able to wear it while pregnant, provided that I don’t get any bigger!

The exceedingly uneven hem.

My goal for this dress is to turn it into a side laced “sideless” surcoat. I’ve seen it worn at a couple of events and in an old pattern book of mine for theater costumes. I’m not sure how period it is but I like how it looks and will allow for my expanding waistline without making it hang oddly which is a problem I’m experiencing with one of my earlier surcoats. I have a dark blue linen that’s approximately the same weight which I will use to border the hem and add to the sides. I’m planning on spiffing up the seams where the new material meets the old with a custom made bias tape of a cotton gold upholstery fabric that I picked up from JoAnn’s a while back.

I wish I had the time to make my own trim for this but I only have a nine foot inkle loom and I would have to warp the same pattern twice to make enough for this dress. I also simply don’t have the time. Not with a three year old and a baby due in November! I try to go for non-metallic store-bought trim when I want to add something with more “oomph” than just some bias tape or piping. I play in the SCA for fun not a period perfection headache. Would I like to be more period? Sure! I’m not going to let authenticity or lack thereof make me miss out on something I love to do. Okay, enough ranting now!

I’ve drafted the side piece that I want to add and I have the bias tape mostly made up. I’m hoping that tomorrow I can take pictures of both and add them to the post. It all depends on how much I get done on the daily to-do list around the house!

Categories: 13th Century Garb, Garb | Tags: , , , | Leave a comment

Ack! Current Projects

So I haven’t posted to this, my SCA clothing journal, in two years. I do have a somewhat valid excuse. In two years we’ve moved, my business is getting re-started, I’m working part time, and we have just finished the basement (sewing room). It’s been a crazy couple of years.

Beyond that I am pregnant again and now I actually have to worry about maternity and garb. *Sigh* There are a number of ways to approach it and there are some handy articles out there on how to modify current garb and what type of garb is best for the pregnant modern day medievalist. I’ve collected the pages that I plan on using on my current project: a rework on a light blue linen tunic dress that was pretty badly put together. I’m planning on turning it into a surcoat that I can wear to Fall Crown here in the E.K. Not sure how it’s going to turn out but I do have a lot of work to do on it.

The good news is that with the sewing room put together I can now work and not have to worry about cleaning up every evening. I also have added a dress form to my collection of sewing stuff which makes fitting myself much easier!

For now that’s pretty much it. I’ll post pictures of my work in progress in a little bit…after I figure out what to do with it! medievalist.

Categories: General | Tags: , , | Leave a comment