***PLEASE BE PATIENT THIS POST IS IMAGE-HEAVY***
I am very excited to be going to Pennsic this year. Sadly, after having my second baby my body doesn’t resemble what it used to. Needless to say that I now need make more garb and alter the few things that I can, in order to have a workable wardrobe for Pennsic.
 |
Woman’s outfit, from an 11th century illustrated
manuscript in the British Museum. |
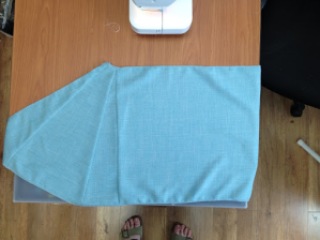
One of the pieces that I used to have (it seems to have walked off somewhere) was a super tunic or an over tunic called a Gunna, in the fashion of the Saxon women, like the one to the right. It was not one of my best pieces of work. I had made it in the “quick and dirty” fashion. That is, I took my existing tunic dress (folded in half lengthwise) and placed it on another piece of fabric folded in quarters. I traced the shape I wanted according to the existing dress. Like the picture below. It was something done on the spur of the moment and the finishing was awful. The fit wasn’t perfect but I t was comfortable and easy to wear. With all that in mind I decided to make another.
 |
| “Quick and dirty” method. |
I don’t usually like using what I call “icky” fabric like rayon, nylon, and polyester. I do however make exceptions. This is one of those times. While there are a lot of cons to using this kind of fabric like no breathability, odd textures, and it’s tendency to melt when touched with fire, there are a few good things to keep in mind. Many of these fabrics are hard to wrinkle and generally wrinkle less when packed. Need to look great on the first day at an event and don’t have time to let something hang out to get the wrinkles out of that linen? This is perfect for that. Also, I find that these fabrics are harder to stain. The big clincher: the price. Linen/Rayon blends are cheaper than straight linen and even linen/cotton blends in many cases.
 |
| Pieced sleeve. 4 pieces to achieve the desired bell shape. |
In any case I found myself with a bright teal piece of fabric that seemed to suit my purpose. Like I usually do, I washed the fabric and dried it on the hottest setting. (This is what’s meant by pre-shrinking folks. Do it before so you don’t wind up with a child size later.) After all of that I ironed it and measured the final dimensions. Then came the planning. I know what I want it to look like: a full skirt reaching to my knees and a fairly decent bell sleeve that falls to my elbow. The fabric is sufficiently small that I had to get a bit creative in my layout and piecing of the sleeves. I’ve put a picture of one of my completed sleeves to the left. I had debated on whether or not I was going to surge my fabric but after seeing how easily it was coming apart it was a no-brainer.It was coming apart easier than some linens I know. I put a before and after image below.
 |
| Top seam: serged. Bottom: not serged. |
 |
| Non-serged seams. |
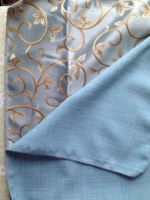 |
| Main material with sleeve lining. |
I also decided at this point that I had to make my over tunic a bit fancier. First of all I needed additional fabric for the gores of the skirt and secondly because I didn’t want the seams to show inside my sleeve. A lining of something fancy was in order. A while back I picked up several pieces of fabric from the remnants bin at Osgood’s. So many good finds! In any case I have a light blue satin with vines that will do the trick nicely. I’ve added the picture above.I thought about doing the neck facing in the same material but in the end I didn’t have enough.That’s okay though. This was planned to be a use of odd bits, ends, and remnants.It’s part of the reason that the sleeves turned out the way they did. So I put both the sleeves together and then just took them and traced them on to the lining fabric to make sure they matched up. The satin I didn’t bother to piece and just did it in one whole piece. I had enough fabric to do it and then my OCD wouldn’t kick in to try and match the pattern on each piece. I was working out of habit when I sewed my lining and sleeve together.I realized that the traditional methods of sewing weren’t going to apply. Traditional methods of sewing the lining and main piece together are to sew the three sides together and then turn it inside out or sewing the separate pieces into tube than putting them together didn’t really work. It didn’t help that I had had to put them together over two days. I ended up going to bed saying, “Don’t make that same mistake again tomorrow morning.” It inevitably meant that I did make the same stupid mistake. Lesson learned! The end result was very nice and I was super excited to get the rest of it put together!
 |
| Both sleeves complete with lining. |
Just taking a moment to show you the sleeves since I mentioned how they turned out earlier. Usually the sleeves would be rounded on the bottom, not squared off. The lining looks great and I’m really happy with how they look.
The sleeves done, it’s time to tackle the main body part of the tunic. This is fairly straight forward. I’m not putting any gores in the front or back of this piece. Again, remember that I’m working with small fabric pieces to begin with. As it is I have to use the vine satin to put the side gores in. All I have of the solid teal-blue color is a strip about two inches wide.
After I’ve cut the gores out I’m faced with what to do about the neck facing. With not enough fabric of either to do the facing the way I usually do, I go diving into my remnant bin. I cam out with this dark goldenrod cotton which worked perfectly. Now I just had to decide on what kind of neck to do. I usually do the fastest thing for myself and, since this was fancier than most of the stuff I’ve made for myself, I decided to go with a keyhole type neck. The biggest thing for necklines is to place them properly. It’s easiest to just find the center and layout your neckline over that. I took the time to do it properly: 2/3 of the opening in front and only 1/3 behind. The keyhole is a pain when I’m working towards a deadline but thanks to a hot iron and plenty of pins I was able to get it done in fairly short order. I put the picture below.
 |
| Neck facing 1/3 done while on the ironing board. |
 |
| Left side done! |
This also takes a lot of pins. And patience. It was well worth it though and after the neckline was done I was able to put my first sleeve on with the gore and I was happy with how it looked. Though in retrospect I think I would attach the sleeves with the drape in back rather than against my ribs…It’s not a huge deal and something I can fix easily down the line. You can see what I’m talking about in the picture above. As it stands now, when I’m moving, you can’t really tell anyways. (See the picture, below.) Oh, and disregard the orange dress peeking out from under the blue dress in the pictures at right!
 |
| Left side, arm raised. |
Putting on the last sleeve and gore was a snap. I was able to finish it and hem it all in about four hours. (Interrupted time…baby, husband, etc.) I’ve put the pictures of the completed right side and the completed, hemmed garment below. Yay! My first new piece of garb in four years…*lol*
 |
| Completed, hemmed supertunic. |
 |
| Completed right side. |
Related